Backline Blueprint: Pedal Steel, Fiddle and Acoustic Rigs for Festival Stages
Every festival stage, especially at country and folk music events, presents unique challenges in backline management. Fiddles, pedal steel guitars, banjos, and acoustic instruments are staples of country music festivals from Nashville to Australia – and they all have special needs. Festival producers around the world have learned that a well-planned backline can make the difference between a seamless show and onstage chaos. Backline blueprint refers to a detailed game plan for all the instruments and gear on stage, ensuring every act sounds great and transitions are lightning-fast. This guide lays out an expert blueprint covering quiet pedal steel setups, robust guitar amps with plenty of headroom, acoustic DI solutions, and smart strategies for quick changeovers. These insights come from decades of hard-earned festival experience and are meant to help both up-and-coming and seasoned festival organizers keep their stages running like clockwork.
Quiet, Reliable Pedal Steel Rigs
Pedal steel guitars produce gorgeous, haunting melodies in country music – but they can also be the trickiest instrument on the stage. To support pedal steel players, provide a quiet and reliable steel rig that minimizes noise and won’t break down mid-set. Start with a high-quality amplifier known for pedal steel use. Many professional steel players favor amplifiers like the Peavey Nashville series or a Fender Twin Reverb for their clean tone and power, a preference frequently cited in discussions on the Steel Guitar Forum. These amps offer plenty of clean headroom (so the sound stays clean and undistorted even at high volumes) and rich reverb, which steel guitarists love. In fact, veteran steel guitarists say that if a Twin Reverb or Peavey Nashville 400 “works properly and has a sweet reverb tank, we are golden,” a sentiment echoed by experienced players on community forums.
Beyond the amp, consider the accessories that a touring pedal steel guitarist might need. Stock a volume pedal that is quiet (no crackles when pressed) and dependable – the volume pedal is essential to how pedal steel is played. Passive volume pedals (potentiometer-based) can get scratchy over time, so if possible invest in an active volume pedal model and keep a spare power supply for it. It’s wise to include a sturdy steel guitar seat or adjustable keyboard bench (pedal steelers usually sit while playing). If your festival is expecting fly-in artists, you might even keep a pedal steel guitar on hand (such as a standard single-neck model with an Emmons setup) as an emergency backup. While most steel players travel with their own instrument due to personalized setups, having one available can save the show if a player’s gear is lost in transit or damaged. For example, one European festival had a pedal steel on standby when an artist’s instrument legs went missing in airline luggage – the backup guitar allowed him to perform with minimal delay.
Crucially, test the pedal steel rig for unwanted noise before the festival. Steel guitar pickups can be hot and sensitive; ensure the amp and pedal are properly grounded to avoid hum. Use quality cables and eliminate any buzz or hiss. When the stage goes quiet for an intimate steel solo, you don’t want a noisy amp humming in the background. Reliability is king here – a well-maintained amp (fresh tubes or servicing as needed) and a backup plan for every component (extra cables, extra steel bar and picks, spare strings for the steel’s unique gauges, etc.) will keep the music flowing. A “be prepared for the worst” mindset is essential. As festival veterans like to say, if nothing goes wrong, those backups were a free insurance policy – and if something does go wrong, you’ll be thankful you had them!
Twin Guitar Amps with Big Headroom
Country and bluegrass bands often have multiple guitarists (or a guitarist plus a steel player), so always provide twin guitar amps with plenty of headroom. In this context, “twin” means two separate guitar amplifier setups – each capable of loud, clean output – ready on the stage. Why two amps? First, many bands have at least two players needing amps. Second, even for a single guitarist, having a pair of amps gives options: artists might choose between a couple of amp flavors, or even use both for a stereo sound. And the phrase “with headroom” is key: festival stages are large and outdoor crowds are noisy, so small low-wattage amps that sound great in a club might distort or run out of volume on an open-air stage. High headroom amps ensure the guitarist’s tone stays crisp and clear at high volumes without unintended distortion.
Planning a Festival?
Ticket Fairy's festival ticketing platform handles multi-day passes, RFID wristbands, and complex festival operations.
For example, a Fender Twin Reverb (an 85-watt tube amp) is a classic choice at country festivals because it stays clean and loud – perfect for sparkling country Telecaster licks or pedal steel swells. Pair that with, say, a Vox AC30 or a modern boutique amp (like a Tone King or Milkman) to offer a different voicing, and you’ve covered the bases for most artists’ preferences. It’s not uncommon for festival backlines to include at least one American-voiced amp (Fender-style) and one British-voiced amp (Vox/Marshall-style) so that artists can pick what suits their sound. The main point: whichever models you choose, they should be powerful (30–100 watts), well-maintained, and have clean tone at high volume. Fresh tubes, functional speakers, and no grounding issues are a must – nothing derails a show like a crackling amp or one that blows a fuse during a set.
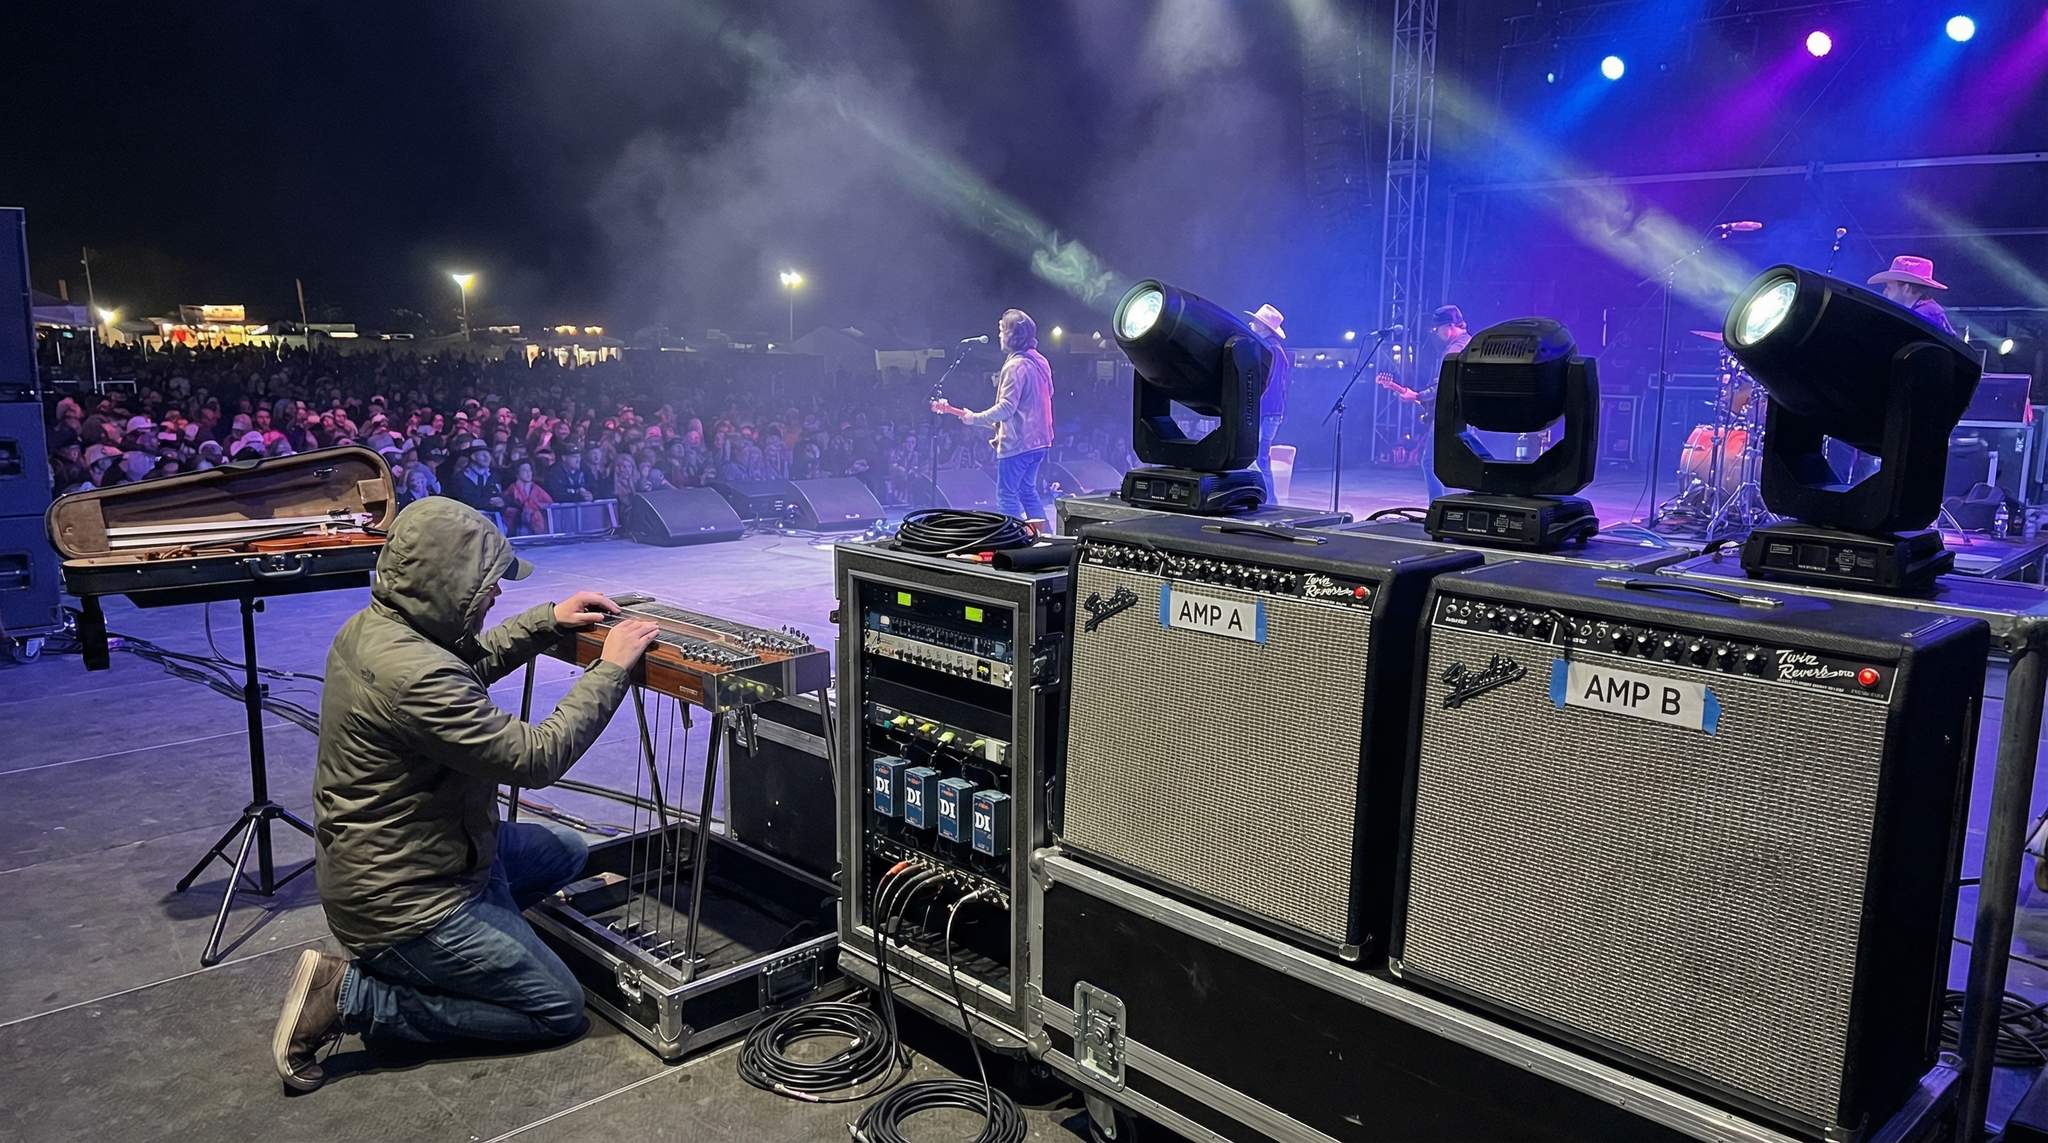
Placing two amps on stage also means you’re prepared if one fails: the guitarist can quickly move to the second amp with minimal interruption. Some festivals even set up an A/B switch for the lead guitar, feeding two amps, so that if one dies mid-song the sound engineer can immediately switch to the other. This redundancy is the kind of foresight seasoned festival organizers employ to keep the show going no matter what. At large-scale festivals like Stagecoach in California or CMA Fest in Nashville, where dozens of guitarists plug into provided backline amps over a weekend, such backup planning is standard. The artists and their guitar techs will appreciate seeing robust amps on stage – it signals that the festival cares about their sound. Conversely, if your event is a smaller local festival with limited gear, you can still achieve this by borrowing or renting two good amps and ensuring they’re tested and stage-ready. Even on a tight budget, it’s better to have two decent amplifiers than one “top shelf” amp with no safety net. Quick tip: mark one amp as “Amp A” and the other as “Amp B” using tape labels, and communicate to the band which is their primary and which is backup or for a second guitarist. Clarity like this prevents confusion during a fast changeover.
DI Options for Acoustic Instruments
Acoustic guitars, mandolins, banjos, and upright basses are common at country and folk festivals – and they often need special handling to sound good through a big PA system. Unlike electric guitars, which have amps, acoustic instruments usually go direct into the sound system. That’s where DI (direct input) options for acoustics become vital. A DI box converts the high-impedance signal from an acoustic pickup (or any instrument output) into a balanced, low-impedance signal like a microphone, which the stage snake and mixing console expect, a process detailed in Premier Guitar’s essential gig tips. In simple terms, a good DI box lets you plug an acoustic instrument directly into the PA with minimal noise and proper signal level. Every festival backline should include multiple high-quality DI boxes for guitars, fiddles (if using pickups), banjos with pickups, and even accordions or other folk instruments.
When we say “options” for acoustics, it’s because not all DI boxes are created equal. Active DI boxes (which may require phantom power or batteries) can provide stronger signal and more features, which is helpful for passive pickups. Many acoustic musicians travel with their own preamp/DI (for example, folk artists often carry an L.R. Baggs or Fishman preamp pedal). But if they don’t, you should have something good ready to go. Industry-standard DIs like the Countryman Type 85 or Radial JDI are renowned for their durability and clean, faithful sound, which are highly recommended for acoustic guitarists. These boxes won’t color the instrument’s tone and often include features like ground lift switches (to eliminate hum from grounding issues) and pad switches (to handle hotter signals). For even more control, an acoustic-specific DI/preamp like the L.R. Baggs Para DI offers built-in EQ and notch filters to tame feedback – handy tools on a loud stage to help manage feedback and tone.
Make sure your stage crew knows how to deploy DIs quickly. Color-code or label them for each instrument (for instance, label one “Guitar DI 1” and another “Mandolin DI”) so there’s no mix-up plugging in cables. It’s also wise to have spare XLR and instrument cables right at the DI, neatly coiled, because acoustic players might switch instruments mid-set (e.g. guitar to mandolin) and need a fast swap. If your festival has multiple acoustic acts back-to-back, consider setting up a small “acoustic hub”: a section of the stage with a couple of DIs, mic stands, and maybe an acoustic amplifier if requested, all ready to accommodate any acoustic instrument input. On larger stages, monitors for acoustic instruments should be carefully EQ’d to avoid feedback – often a sound engineer will ring out the monitor frequencies in advance. By having quality DI solutions and knowing how to handle them, you’ll ensure that the delicate sound of acoustic guitars and fiddles is heard clearly by thousands of people without a hitch.
Clip-On Mics for Fiddle and Banjo
If your lineup includes fiddlers and banjo players (as many country, bluegrass, and folk festivals do), plan ahead for how to amplify them. While some fiddle players use pickups, many prefer the natural sound of a microphone. The solution: provide quality clip-on microphones for fiddles and banjos. A clip-on mic is a small condenser microphone that attaches directly to the instrument – often on the fiddle’s body or strings behind the bridge, or on the banjo’s rim. This allows the performer to move around freely, and keeps a consistent mic distance for steady sound. Importantly, using a high-quality clip-on mic designed for these instruments will capture the rich tone without adding too much weight or feedback risk.
Need Festival Funding?
Get the capital you need to book headliners, secure venues, and scale your festival production.
Not all clip-on mics are equal, so invest in a couple of road-proven models. For instance, DPA Microphones makes the renowned DPA 4099 series, which has violin and banjo specific mounts – these mics are favored by many touring fiddlers for their excellent sound and feedback rejection. There are also more budget-friendly options from Audio-Technica, AKG, and others that still offer good performance. The key is to look for a miniature condenser mic with a secure mounting system and a cardioid (directional) pattern to minimize bleed from other stage sounds. Wireless or wired? In a festival setting, wired clip-on mics are simpler (no battery packs to manage mid-set), but if an artist is known to roam far across the stage, a wireless pack can be provided. In either case, have fresh batteries on hand for any active components.
Using clip-on mics for fiddle and banjo solves a lot of stage problems. It removes the need for the player to stay glued to one spot in front of a microphone stand (which is hard if they also sing or move with the music). It also tends to reduce feedback compared to a stationary mic, because the mic moves with the instrument and can be kept at a consistent volume. However, there are still limits – a fiddle with a mic can feed back if monitors are blaring directly at it. Work with your sound engineer to position monitors smartly (often fiddlers prefer a monitor at their feet pointing up, rather than a floor wedge pointed at the fiddle’s f-holes) and use EQ to notch out problem frequencies. Encourage the fiddle and banjo players to do a quick soundcheck or line-check with these clip-ons to dial in their sound. Many bluegrass festivals, for example, will have the band’s fiddler quickly play a few licks during changeover so the engineer can set the gain just right. By providing a quality clip-on mic, you’re giving those musicians the tools to shine and the freedom to perform naturally. And always keep a standard backup mic on a stand nearby as well – if a clip-on fails or a musician prefers not to use it, you can revert to a regular microphone without delay.
Color-Code Looms and Label Everything for Quick Swaps
Fast changeovers are the heartbeat of a festival’s schedule. When one band finishes, the next band’s gear often has to be ready on stage in 15 minutes or less. That pressure is why color-coding cable looms and labeling everything is a lifesaver for stage crews. A “loom” in this context is a bundle of cables that are tied or wrapped together, often for a particular set of inputs or a section of the stage. For example, you might have a loom for the drum kit inputs, another loom running to the keyboard position, and another for front-line vocals and instruments. By color-coding these looms (using colored electrical tape or heat-shrink tubing), you can identify them at a glance during a swap. Label each end of every cable too – ideally with what it plugs into (“Vocal 1 Mic”, “Fiddle DI”, “Stage Right Guitar Amp”) or at least a number that corresponds to an input list.
Imagine how much time you save when you can say “unplug the green loom and plug in the blue loom” versus tracing individual cable connections one by one. As one live sound crew expert noted, it’s much faster to match a green tape cable to a green-marked port than to squint at tiny channel numbers, a strategy emphasized in SoundGirls’ guide to color coding. Use this concept across the stage: for instance, wrap the main fiddle DI cable and its corresponding snake line with red tape, the banjo’s with blue tape, etc., and put matching tape on the jacks where they plug in. During a hectic changeover, the team can quickly yank out the cables for the previous band and connect the new ones in the right spots by color, drastically reducing patching errors. Many festivals use yellow tape to mark “spare” or extra cables, a common standard across departments – you could adopt a similar convention (e.g. any cable with yellow tag is a backup line already run out and ready to use if something fails).
Labelling goes beyond just cables. Label mic stands (“#1”, “#2”, etc. or “Lead Vox”, “Fiddle”) so that if they get moved, you know what goes where. Label instrument amplifiers with the stage position or instrument (“Steel Amp”, “Guitar SR (stage right) Amp”). Also label power drops and outlets so artists or techs can safely plug in pedalboards or keyboards without trial and error. If multiple bands share the same backline amps or drum kit, mark knob positions with a little piece of tape or a grease pencil line for a default setting – and include that info in your stage notes. This way, if a previous band drastically changed the EQ on the amp, your crew can reset the knobs to a neutral or “house” setting quickly (or at least know where it was).
Another pro tip: have separate stage plots or input lists for each band, but also maintain a master stage patch plot – essentially a map of the snake channels and what each is generally used for (with color codes). For example, channels 1-8 might always be drum loom (colored green), 9-12 guitars/DI (blue loom), etc. When a band has fewer inputs, you still plug into the corresponding channel according to the loom, leaving any unused labeled “NC” (no connection). This consistency means the front-of-house and monitor engineers also know what to expect where, speeding up line checks. In short, color coding and labeling is about creating an intuitive system that anyone on the crew can follow. It reduces the chances of mistakes and cuts down the time spent troubleshooting during those precious few minutes between acts.
Spare Capos, Tuners, and Strings at Arm’s Reach
In the middle of a high-energy festival set, the last thing you want is an awkward pause because a guitarist broke a string or a banjo player misplaced their capo. Seasoned festival organizers know to keep spare capos, tuners, and strings within arm’s reach on the stage. These small items are lifesavers that can rescue a performance in seconds. The trick is to have them strategically placed: you might set up a small “guitar tech” station at the side of the stage, or even clip extras to mic stands where appropriate.
At minimum, have a couple of universal capos (the spring-clamp type fits most guitars and banjos) taped to mic stands or sitting on top of a guitar amp where performers can easily see them. If a singer-songwriter walks on and realizes their capo is missing, they can grab the spare immediately rather than panicking or searching their case. For tuners, compact clip-on tuners (like Snark tuners or similar) are ideal as spares – they can live on the headstock or be quickly clipped on by a crew member. Keep a few tuner batteries handy too, because a dead tuner helps no one. In fact, any gear that uses batteries (acoustic guitar preamps, wireless packs, etc.) should have spares on standby in the same area.
Strings are perhaps the most frequently needed spare. Guitar strings, banjo strings, fiddle strings – all can and will break eventually. Stock a variety of gauges: light and medium acoustic guitar sets, a couple of electric guitar sets (gauges .010 and .011 cover most), a set of fiddle strings (at least an extra E string, which is the most prone to snap), and banjo strings including extra 5th strings. It’s not unheard of for a musician to break the same string twice in one show (especially high-energy flatpickers snapping guitar strings). If the artist doesn’t have a personal tech to restring for them, your crew can offer the fresh string immediately. Even better, keep a spare instrument or two on standby if possible – for example, a decent acoustic guitar tuned up side-stage can be rushed on as a loaner if a string breaks and the performer doesn’t want to pause to restring. This is more feasible at larger festivals where a “house guitar” can be part of the backline. At smaller festivals, you might coordinate with local musicians to have an extra instrument available just in case.
Don’t forget other small but crucial spares: picks (guitarists and banjo players are always dropping or flinging them), slides (if any slide guitar or Dobro players are on the bill, a spare steel or glass slide could be gold if theirs rolls off into the dark), and instrument cables (a short patch cable or guitar lead can die without warning – having a tested spare cable coiled at the amp means a swap can happen in seconds). Essentially, create a “Oh no!” kit for your stage: anything an artist might cry “oh no!” about onstage, have a spare of it ready to go. As one guitarist’s gig tip humorously put it, “You will need this gear – it’s a cosmic rule – so have it on hand,” according to expert advice on gig preparedness. Your job as the festival organizer is to anticipate those needs so the show never stops. When artists realize the crew has spares of nearly everything, it boosts their confidence and goodwill towards the festival.
Finally, assign a crew member to monitor these spares throughout the event. After each set, they should quickly check if the last band borrowed a capo or used the spare strings, and replenish them from the supply. That way, the next act isn’t left without a backup because the previous artist accidentally walked off with the spare or used the last fresh string.
“Reset to Default” Checklists for Every Stage
After a flurry of performances, with multiple bands rotating on and off, a festival stage can become a jumble of moved mic stands, changed settings, and stray gear. That’s why implementing a “reset to default” checklist for each stage is one of the smartest things a festival producer can do. This checklist is essentially a routine to restore the stage to a known baseline between acts (or at least at the start of each day or segment). It ensures that nothing is overlooked in the rush, and it makes each transition as smooth as possible.
What might a stage default reset include? Start with the audio basics: all faders down or muted on the mixing boards until line check, monitor sends set to a nominal starting level (or zero if they’ll be built fresh for each act), and any console routing returned to the default festival patch. This prevents the next band’s first notes from blasting out unpredictably because someone left a channel unmuted or EQ cranked. On stage, return mic stands to their standard positions as per your stage plot – for example, if the last band had the vocal mics moved far stage left, bring them back to center if that’s the usual setup. Check that all microphones are still securely attached (none loosened or repositioned oddly) and that instrument mics or DIs are back in place ready for the next performer. If you struck (removed) any mics or cables for the previous act (perhaps they didn’t need them), bring them back out now and put them where the default plot indicates.
For backline gear, reset amplifiers and equipment settings to neutral. Many festivals will dial guitar amp EQs to a middle setting and volume to a safe low level after a band is done, so the next artist doesn’t plug in to find the amp dimed at full blast or scooped to someone else’s tone. Drum kits should be reset (throne height, cymbal stands placement) if they’re shared kits, according to a standard setup or the next band’s input. Keyboards or other provided instruments should be put back to patch #1 or a piano sound unless told otherwise. Essentially, undo any dramatic changes the last act made.
The reset checklist should also cover stage safety and tidiness: remove empty water bottles, stray beer cans, or any personal items left behind by artists. Coil up any loose cables that are not in use for the next setup so they’re not a tripping hazard. If the sun has set or lighting changed, ensure the stage is well-lit for the crew to work (have a flashlight or work light ready for dark stages to see those cable labels!). Making a physical or digital checklist for these tasks and posting it backstage can be incredibly helpful. For example, a basic Stage Reset Checklist could look like:
- Amps on standby or volumes down to safe levels.
- Mics back to default positions (per the standard stage plot).
- Clear the stage floor of any leftover items (setlists, picks, tape, bottles).
- Set up the next band’s basic backline according to their input list/stage plot.
- Verify all labeled cables/looms are reconnected appropriately for the next act.
- Notify the audio team (FOH and monitors) that the stage is reset and ready for line check.
Tailor it to each stage if your festival has multiple stages, since equipment and defaults might differ.
By following a reset routine, you create a consistent starting point for each performance. This not only reduces technical errors (for instance, no one wonders “Is this cable not working, or was it just unplugged and not put back?” – because the reset routine would have caught it), but also impresses the artists. Bands will walk on to a stage that feels organized and ready, not a chaotic mess left from the previous group. On the rare occasion when something still goes wrong, having that checklist means you can quickly troubleshoot – you know how things were supposed to be, so finding what’s out of place is easier. All in all, a “reset to default” checklist is about professionalism and consistency. It embodies the festival producer’s mantra: stay in control of the chaos.
Frequently Asked Questions
What is the best amplifier for pedal steel guitar?
Professional pedal steel players favor amplifiers like the Peavey Nashville series or Fender Twin Reverb for their clean tone and power. These amps provide the necessary headroom to keep sound undistorted at high volumes and offer the rich reverb steel guitarists require. A reliable rig must also be properly grounded to minimize noise.
Why do festival stages need guitar amps with high headroom?
High headroom amplifiers ensure a guitarist’s tone remains crisp and clear without unintended distortion, even at the high volumes needed for outdoor stages. Powerful 30–100 watt amps, such as the Fender Twin Reverb, allow country Telecaster licks and pedal steel swells to stay sparkling clean where smaller low-wattage amps would run out of volume.
How do you connect acoustic instruments to a PA system?
Acoustic instruments connect to PA systems using high-quality Direct Input (DI) boxes that convert high-impedance pickup signals into balanced, low-impedance signals. Industry-standard DIs like the Countryman Type 85 or Radial JDI ensure clean sound, while acoustic-specific preamps like the L.R. Baggs Para DI offer built-in EQ and notch filters to help manage feedback.
What are the benefits of using clip-on microphones for fiddles?
Clip-on condenser microphones, such as the DPA 4099 series, allow fiddlers to move freely on stage while maintaining a consistent microphone distance for steady sound. These mics attach directly to the instrument to capture rich tone and reduce feedback issues compared to stationary microphones, provided monitors are positioned correctly to avoid interference.
How does color-coding cables help with festival changeovers?
Color-coding cable looms and labeling inputs allows stage crews to identify connections at a glance, drastically reducing swap times between bands. By wrapping cables with colored tape to match specific ports, teams can connect gear without tracing individual lines. This visual system minimizes patching errors and keeps the stage organized during fast-paced schedules.
What spare gear should be kept on stage for country music festivals?
Essential on-stage spares include universal capos, clip-on tuners, and replacement strings for guitars, banjos, and fiddles. Organizers should place these items, along with batteries, picks, and spare instrument cables, within arm’s reach of the performers. This preparation allows artists to quickly resolve broken strings or missing equipment without stopping the show.